Fix UEFI Boot in Windows 7
The step-by-step instructions for fixing the UEFI/EFI boot on a Windows 7 system are very similar to those of Windows 8/8.1:
- Use bootrec
- Use diskpart
- Use Easy Recovery Essentials
Windows 7 can’t be installed if your computer’s UEFI/EFI mode is set as active and not in Legacy mode. Legacy mode allows your computer to boot Windows 7.
If your computer model is new and has UEFI/EFI installed, but you have Windows 7 installed, it’s most likely that you’re running UEFI/EFI as Legacy.
Follow the instructions from prerequisites below before you start.
Prerequisites
Before you start using the bootrec or the diskpart command to fix the bootloader of your Windows 7 system, first you must determine that UEFI/EFI loads with the Legacy mode active.
Follow these steps:
- Restart your computer
- Press the necessary key to open UEFI/EFI. The key depends on your PC manufacturer and PC model.Most common keys are: F2, F8, F12, Del. Esc is also an option.
- Once inside the UEFI/EFI setup menu, search for Secure Boot.This is usually found at any of the following tabs: Boot, Authentication or Security.
- Make sure Secure Boot is either Disabled or Off
- Save these settings and exit the UEFI/EFI setup menu
![Secure Boot [Enabled] on a Dell computer](https://i2.wp.com/neosmart.net/wiki/wp-content/uploads/sites/5/2014/02/dell-uefi-secure-boot-enabled-disabled.png?ssl=1)
Secure Boot [Enabled] on a Dell computer
![Secure Boot [Enabled] on a HP computer](https://i0.wp.com/neosmart.net/wiki/wp-content/uploads/sites/5/2014/05/HP-Secure-Boot.jpg?ssl=1)
Fix #1: Use bootrec
To use the bootrec utility and fix the boot error of your Windows 7 system, follow these steps:
If you don’t have the Windows 7 installation CD/DVD to run Command Prompt, go to Fix UEFI Boot with Easy Recovery Essentials.
- Insert the original Windows 7 installation CD/DVD and boot from it
- Select a language, keyboard and click Next
- Select the operating list (Windows 7) from the list and click Next
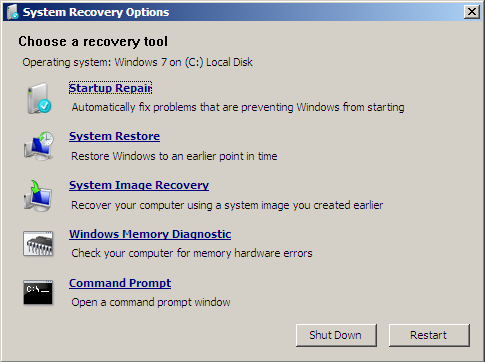
- At the System Recovery Options screen, click Command Prompt
- Type:
bootrec /fixmbr
- Press Enter
- Type:
bootrec /fixboot
- Press Enter
- Type:
bootrec /ScanOs
- Press Enter
- Type:
bootrec /rebuildBcd
- Press Enter
- Remove the installation CD/DVD, type exit, press Enter and restart your computer

Fix #2: Use bootsect
Follow these steps to run diskpart to repair the boot sector code of the Windows 7 installation:
- Follow the steps from Fix #1: Use bootrec until you reach Command Prompt
- Type:
bootsect /nt60 SYS /mbr
- Press Enter
- Remove the Windows 7 installation CD/DVD from the disc tray, type
exit in Command Prompt and press Enter
- Restart your computer
 Windows 7 bootsect utility results screen
bootsect /nt60 SYS /mbr
exit in Command Prompt and press Enter
Windows 7 bootsect utility results screen
Fix UEFI Boot in Windows 8, 8.1 or 10
To fix the UEFI bootloader on a Windows 8, Windows 8.1 or Windows 10 system, you can follow these options:
- Use diskpart to check if the UEFI partition has a drive letter assigned (if not, it must be assigned)
- Use Automatic Repair if diskpart doesn’t work
- Use Easy Recovery Essentials to automatically fix the UEFI bootloader
Fix #1: Use diskpart
If the UEFI partition on your computer doesn’t have a drive letter assigned, this may be the primary cause of your computer’s boot error.
A common is to use the diskpart utility (available on the Windows 8/8.1/10 recovery disc/USB) to make sure the UEFI partition has a letter assigned to it. If it doesn’t, you’ll assign it a letter.
The instructions you need to follow are:
- Insert your original Windows 8/8.1/10 installation disc or installation USB
- Boot from the disc or the USB
- At the Install now screen, click Repair your computer or press R
 Windows 8 Repair Your Computer Menu
- Click Troubleshoot
- Click Advanced options
- Click Command Prompt
- When Command Prompt has finished loading, type:
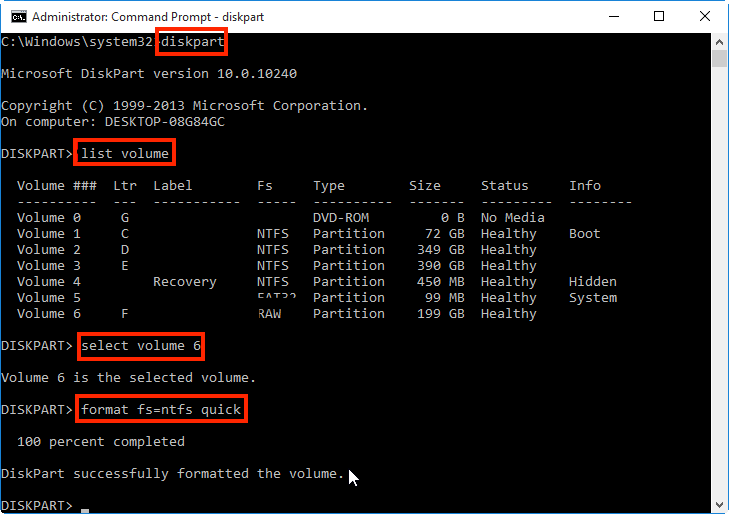
diskpart
- Press Enter
- The diskpart utility should now be loaded:
DISKPART>
- Type:
sel disk 0
- Press Enter
- Wait for the confirmation message:
Disk 0 is now the selected disk.
- Type:
list vol
- Press Enter
- diskpart will now show the full list of volumes available on your PC

- Find the UEFI volume from the list. This usually has “BOOT” mentioned on the Label column, “System” on the Info column. The Fs column might FAT32 specified.For our example, in the next steps, our UEFI partition will be on Volume 2.
- Type:
sel vol 2
- Press Enter
- Type:
assign letter=G:
Where G: should be a unique drive letter. It can’t be already used, e.g. C:\, D:\
- Press Enter
- Wait for the confirmation message:
DiskPart successfully assigned the drive letter or mount point.
- Type:
exit
- Press Enter
- Type:
cd /d G:\EFI\Microsoft\Boot\
Where G: is the drive letter you’ve assigned to your UEFI partition a few steps back. If the \EFI\Microsoft\Boot\ folder doesn’t exist (the error message will be “The system cannot find the path specified”), you can run the same command on alternative paths:
cd /d G:\Boot\
or
cd /d G:\ESD\Windows\EFI\Microsoft\Boot\
Remember to replace G: with the UEFI’s partition letter.
- Type the bootrec command:
bootrec /fixboot
NOTE: on newer Windows 10 installs this command may return with an “Access Denied” error. On those versions the following command should be run:
bcdboot C:\windows /s V: /f UEFI
- Press Enter
- For backup purposes, backup the BCD record of your computer like this:
ren BCD BCD.bak
- Recreate the BCD using the bcdboot command:
Bcdboot C:\Windows /l en-us /s x: /f ALL
Where C:\ is the letter of the drive where Windows 8, Windows 8.1 or Windows 10 is installed on. The /l en-us parameter is used for localization: US. You can use ln /en-gb for UK localization.
- Press Enter
- You can also run this command too:
bootrec /rebuildbcd
- Press Enter
- Type
exit in Command Prompt
- Restart your computer
- Your Windows 8/8.1/10 should now boot again

Windows 8 Repair Your Computer Menu
diskpart
DISKPART>
sel disk 0
Disk 0 is now the selected disk.
list vol

sel vol 2
assign letter=G:
Where
G: should be a unique drive letter. It can’t be already used, e.g. C:\, D:\DiskPart successfully assigned the drive letter or mount point.
exit
cd /d G:\EFI\Microsoft\Boot\
Where
G: is the drive letter you’ve assigned to your UEFI partition a few steps back. If the \EFI\Microsoft\Boot\ folder doesn’t exist (the error message will be “The system cannot find the path specified”), you can run the same command on alternative paths:cd /d G:\Boot\
or
cd /d G:\ESD\Windows\EFI\Microsoft\Boot\
Remember to replace
G: with the UEFI’s partition letter.bootrec /fixboot
NOTE: on newer Windows 10 installs this command may return with an “Access Denied” error. On those versions the following command should be run:
bcdboot C:\windows /s V: /f UEFI
ren BCD BCD.bak
Bcdboot C:\Windows /l en-us /s x: /f ALL
Where
C:\ is the letter of the drive where Windows 8, Windows 8.1 or Windows 10 is installed on. The /l en-us parameter is used for localization: US. You can use ln /en-gb for UK localization.bootrec /rebuildbcd
exit in Command Prompt